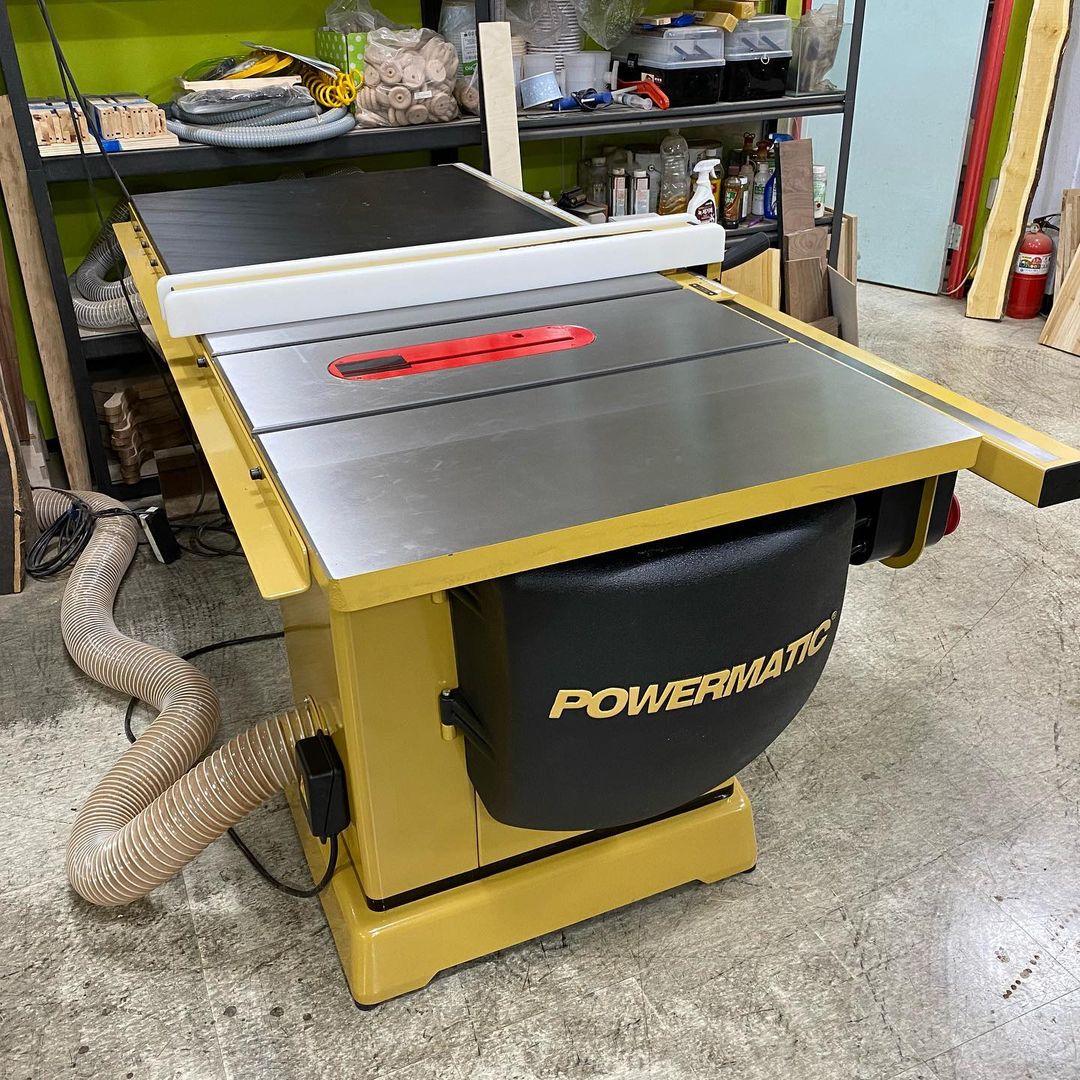
The Powermatic PM2000 table saw is a high end cabinet style saw with several impressive features. These include a genuine riving knife, left tilting blade, built in retractable casters, a magnetic switch, solid cast iron base for stability, built in dust port with blade shroud, and the list goes on!
I had my eye on this puppy for over a year before I finally made the investment in November of 2007. The Saw Stop was at the top of my list but after doing some research the PM2000 became number one with a bullet. The main reason for the change of heart was really just the price difference. Most of the same features can be found on both saws but I just could not afford the much more expensive Saw Stop. The difference in price can be primarily attributed to the unique ability of the Saw Stop to sense when flesh comes in contact with the blade and almost instantaneously stop and drop the blade below the table. This feature can definitely save the user from serious injury. Some people may argue that you can’t put a price on personal safety, but we won’t have that debate here.
I decided to buy the PM2000 when Powermatic ran a special and the local WoodCraft store offered a 10% store credit with the purchase too. I simply could not pass up such a great deal! However, I was not prepared for the new acquisition as well as I should have been. First, I needed to borrow a pick up truck to pick up the saw. It comes in four separate boxes, one heavier than the next, up to the main crate which weighs in at around 650 lbs. A pick up truck is just not the right vehicle to move such a piece of machinery. Second, I did not have enough man power available to help move this beast. If you make a similar purchase be sure to have a truck with a power liftgate and at least three or four strong backs on hand to help move it.
I found everything to be packed very well and in perfect condition out of the box. Included I found a very nice push stick (picture left) and a heavy duty blade wrench (picture right). Once unpacked, there was some assembly work to do. At this time, let me point out that I did not install the included Accu-Fence. Instead I fitted my Incra LS TS to the Powermatic saw (that’s another story for another day). I actually sold the Accu-Fence while it was still new and in the box. I’ve been very pleased with the Incra fence since I got it for my Grizzly contractor saw and didn’t want to change, even for a new saw.
Everything went together very smoothly until I had to put the motor cover door on. The door gets fastened with a clip that fits over a post. The post attaches to the saw body with a threaded stem. When I tightened the nut the threaded stem simply broke off the post. Now I had no way to secure the door closed. The picture at left shows the piece I’m talking about. I contacted Powermatic’s service department and they sent me new parts. Unfortunately, they sent me every piece for attaching the door other than the one that broke! I took no chances with my second contact and sent them a picture of the broken part. A couple of days later I received the correct replacement and all was well. I have to say that I am a little disappointed in this part of the saw. While it holds the door closed most of the time, it is not really the best setup for the task. I would have preferred a stronger, more reliable latching mechanism. Just a minor annoyance but worth mentioning. I will say that Powermatic customer service was excellent though!
Nothing else out of the ordinary was encountered after that. In fact, I was pleasantly surprised to find that the saw was perfectly aligned right out of the box! I’ve been using the saw for several months now and thought it was time to put this review together. There is a lot of good, some not so good, and some tips that I’d like to share…
The Good
This really is an awesome table saw! I am constantly impressed with the fit and finish of all the components. Even the miter gauge is one of the nicest I’ve seen come with a saw. Not quite what you’d buy if you got an aftermarket one, but a very functional well built one nonetheless. The riving knife is quite impressive as well. It can be put on and taken off very easily, which makes it that much more likely to be used. This is a valuable safety feature in itself. The blade guard and kickback prawls are pretty well made to. They attach to the riving knife with a simple button press that when released, locks them in place. Nice!
The extension table is nothing to brag about but serves its purpose well. There is an optional workbench style extension table that looked really impressive but it was a costly option that I didn’t really need. The cast iron top and wings are huge (30.5″ x 42″) and I love having all that space to work on. The wheels used to adjust blade height and bevel angle are oversized (8″ diameter) and very solid. They are works of art by themselves! Very smooth to operate, allowing excellent accuracy for each setting. The center hub is actually a turn screw used to lock the wheel position once set in place (picture at left). This makes it very easy to dial in the right blade height and angle and ensure they don’t change while making cuts. As for the built in casters, they function as advertised. I have the saw in a fixed position so there is no need for me to use them much at all. However, it’s nice to know they are there if I need them.
The weight of this saw is simply overwhelming. Once set in place with the casters retracted, it ain’t goin’ anywhere! Turn it on and you can really appreciate the lack of vibration and the solid whirring sound of the motor. The 3HP motor is a joy compared to my old 1.5HP contractor saw. It really powers through anything I’ve thrown at it (make sure you use a good quality blade for the task at hand – i.e. ripping or crosscutting).
The Not So Good
First let me say that none of this is really a deal breaker as far as I’m concerned. I just couldn’t leave out any of it and call this a thorough review.
The first thing I noticed that bothered me was that there was only a standard throat plate included. I don’t mind that Powermatic doesn’t include a blade with the saw. In fact, that’s something I’d rather pick out myself. However, when you go to buy a dado and/or zero clearance insert and find out how much they cost for this saw, you wonder what the motive was for not including at least a dado insert. I spent a lot of money on this tool and I don’t want to have to spend another $100 or so for accessories that are pretty much necessities for most woodworkers.
The only other thing that irritates me is the dust collection feature inside the cabinet. I’ve had a lot of trouble getting the hose to stay attached to the shroud. The hose is very, very stiff and once you get it connected solidly to the dust shroud that surrounds the blade it has a tendency to pop off if you move the blade too far (up and down or changing bevel angles). Then the cabinet fills with chips and dust and you can notice the dust coming up from the blade opening too. The only way I’ve found to remedy this is to try twisting the hose different ways before you attach it. This way it won’t torque so much when the blade is moved and work itself loose. Trial and error is the best way to manage this problem.
Conclusion
The Powermatic PM2000 is an awesome table saw! I’m very happy with it and would make the same decision again. In fact, it was my first Powermatic tool and since then I’ve purchased two others because of the impression I got from this saw. The saw is available in several different configurations and the price ranges upwards from about $2,300. This is quite a bit to invest in a single tool, especially for a small workshop like mine. However, I have no regrets and thoroughly enjoy using this saw every time I work in the shop. This saw will be around for more than a couple of generations in my family! It is that well made.
Tips
There are a few things you can do to make this saw even better. One thing should be obvious, treat the generous cast iron top with some kind of protectant. I use Boeshield T-9 and then a coat of paste wax. This will keep the top rust free and allow whatever wood you cut to glide smoothly over the surface. Another no-brainer is to use the riving knife and blade guard whenever possible. The safety benefits of these attachments should be your number one priority. The ease of installing and removing them should make it virtually impossible to neglect using them whenever the cut will allow it. I find myself using these much more often than I ever did on my previous saw.
The other thing I want to mention is that you should have a dado insert and a zero clearance insert if you have to make cuts that require them. If you have a dado blade set, then you will need this insert for sure. If you ever have the need to cut small strips or laminated plywood, a zero clearance insert will be most helpful. I made my own from a low cost melamine shelf panel. The after market ones that are available are expensive but well worth the money if you can’t make your own. While I used melamine covered particle board, there are better choices of materials out there. Phenolic is popular with after market inserts as well as other types of hard plastics. Whatever you choose, it’s a good idea to put some wax on the surface as well to make your work pieces glide smoothly along when cutting.
Making Inserts for the Throat Opening
I cut the melamine to a width of about 4.5″ and then cut a 19″ length from this. I took the standard throat plate off the saw, turned it upside down, placed it on top of the melamine plank and traced the outline. I then cut it to rough shape on the bandsaw. I sanded the edges down to the traced lines until it fit in the throat opening over the blade. Once the fit was right I had to adjust the thickness so it would not stick up above the table. I used my bandsaw to resaw it in half and then planed one side until it was just under the table surface when fit in the opening.
In order to be able to adjust the height of the insert, I bought some 35 cent set screws and drilled and tapped holes in the melamine zero clearance insert where the tabs under the table top would be (I put the plate in the opening, tilted the blade all the way left and traced the tabs with a pencil from inside the saw). Once the set screws were in place, I attached a washer to the back underside of the plate. This is very important to do because you don’t ever want the blade to be able to lift the back of the insert up. If so, the blade can throw the insert forward with great force and cause a lot of damage to you or whatever is in front of the saw! Please don’t skip this step if you make your own inserts.
Note: The insert pictured here is not complete yet. It still needs to be cut so that the riving knife will fit through. This is a critical safety component that you do not want to leave out. Never make any cuts without the splitter and/or riving knife in place. They go a long way in preventing kickback and should always be used. That’s why I highly recommend the aftermarket riving knife shown below.
The last tip I have isn’t really a tip. It’s just a suggestion that will increase the safety of this saw. Get yourself the riving knife that doesn’t pass the top of the blade (picture left). The top of this riving knife is always lower than the highest point of the blade (the riving knives always move with the blade too, so they stay in the same position relative to the blade at all times). This aftermarket accessory really should be included with the saw but we’ve already covered that topic. This type of riving knife is very valuable when making cuts that do not put the blade all the way through the work piece. For example, dado cuts, grooves, or rabbets. This riving knife will help prevent kickback caused when the work piece pinches the back of the blade after being cut.
I hope this review is helpful to those of you looking at the Powermatic PM2000 table saw as one of your next purchases. Please feel free to contact me if you think I can provide any more information or if you just have questions or comments about this review!