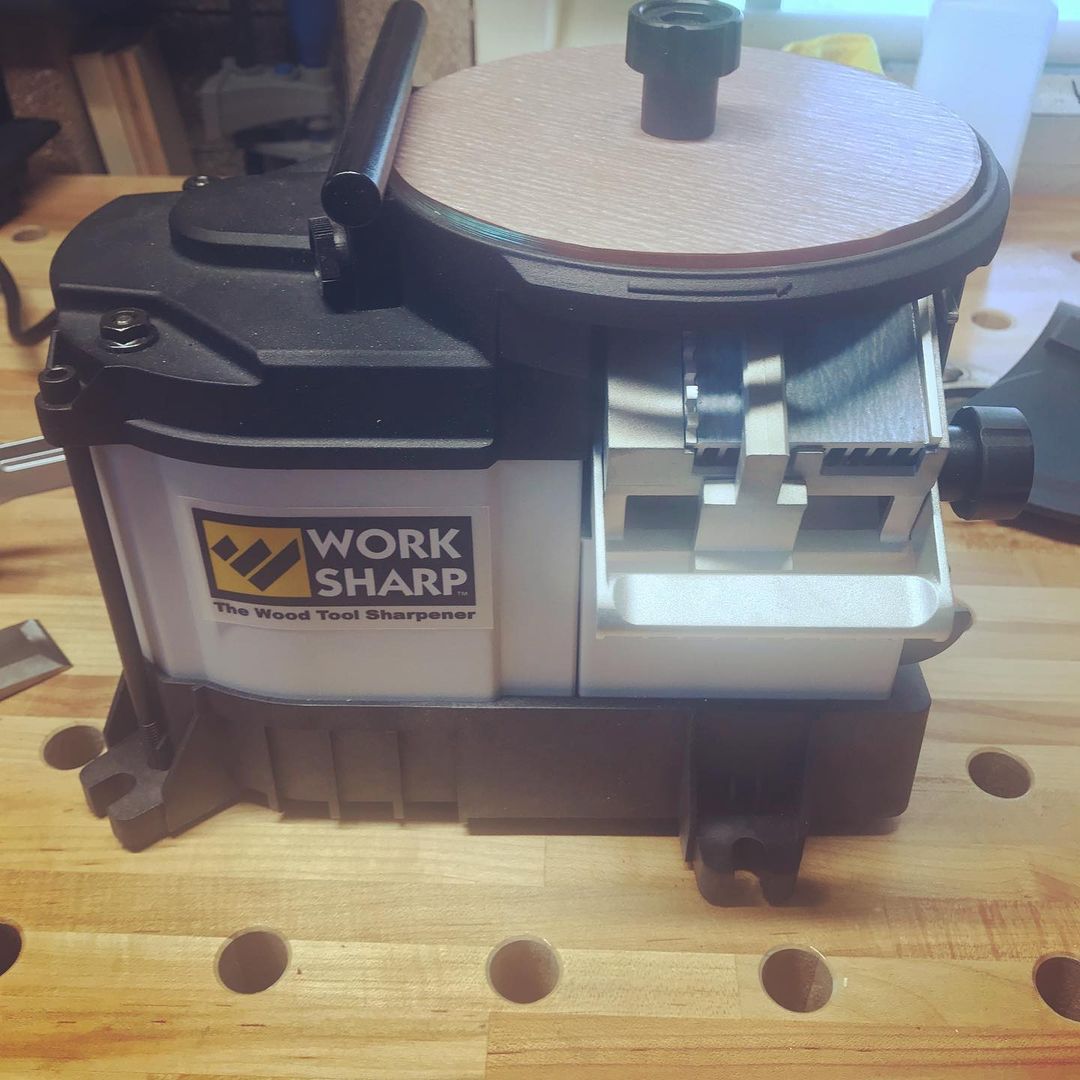
The WorkSharp WS3000 is a powered sharpening system that uses a horizontal spinning surface. It uses PSA sandpaper on tempered glass disks or slotted wheels as the abrasive surfaces. It has a unique angled port under the disk to set the bevel angle of tools such as chisels and plane blades. There is also a tool rest above the wheel for top surface sharpening. The adjustable port provides the ability to set precise bevel angles with perfect repeatability. The slotted wheel allows the user to actually see the edge that is being sharpened against the bottom surface of the wheel.
Let me first say that I am a total novice when it comes to sharpening. I tried using oil stones and an angle fixture but could not seem to get the hang of it. My results were horrible, probably because I was starting with some very dull blades that needed a lot of material removed before they’d be considered even close to sharp.
I started to look at my options and thought it best to go for a motorized sharpening solution. The WorkSharp 3000 caught my eye immediately. The competition is very expensive when you consider the initial cost and then the price of attachments to sharpen different tools. Even some of the manual methods would cost a lot when you figure in the different grades of stones needed to get the best results. With the WorkSharp, the price is very reasonable for what you get. The unit itself seems well made even though there is a good bit of hard plastic. The included accessories are well thought out and cover most of what the average user will need to use. I’m sure I’ll find the need for some extras but for now it appears fairly complete for chisels and plane irons. The instructions are straight forward and well laid out.
Here is the box it came in. It was packed pretty well and all contents were in perfect condition. Aside from the motorized sharpener itself, the box includes two 6″ tempered glass disks, one slotted wheel, a top tool rest, a crepe stick, and a good assortment of PSA abrasives to get started with.
Setup is not very difficult if you follow the instructions. One of the first things you have to do is adhere the PSA abrasives to the tempered glass disks. Each glass disk gets two abrasives; one on each side. First you must clean the glass to ensure the surface is free of any dirt or oils (I used Isopropyl alcohol, commonly called ISA). Next you have to peel the backing off of the abrasive sheets and apply them to the glass disk. This is where it can get a little tricky. Here is a good tip: I had a brainstorm and used a socket wrench extension rod to line up the holes. This made it very easy to align the abrasive with the glass disk.
Another tip is to use a roller of some kind to roll out the air bubbles that may be trapped between the glass and the abrasive. I used a roller top from a glue bottle I had lying around. As you can see from the picture on the right, it is easy to tell when there are no bubbles. By the way, I had no trouble with air bubbles on any of the abrasives (although the 3600 MIcroMesh did have a couple but they rolled out easily).
Once it was all setup, I had to test it out. I selected one of my most worn chisels. This is a 5/8″ chisel and as you can see from the picture, the edge is very dull and even rounded over slightly on the back side. I soon realized that it would take way too long to clean up this edge, even using the WorkSharp’s coarsest grit (P120). So I took the chisel over to my bench grinder and squared the edge of the bevel. This took off the rounded over part of the back as well so I had a flat square edge on the end instead of a sharp beveled edge. I then set to work on the WorkSharp and took the chisel’s bevel and back plane through all the grits.
This is where the WorkSharp really shines (literally)! I lapped the back of the chisel on the top of the wheel with the P120 side up. Then I flipped the wheel over and with the P120 side down, I ground the bevel to 25 degrees in the angled port. I took both sides of the chisel through all the grits in this same way. I then set the port to 30 degrees and put a micro bevel on the edge as suggested in the directions by a “Master Tip” section they included. You can see that the mirror finish on the micro bevel has created a super sharp edge on this old chisel! While it took over 10 minutes to get to this level of sharp, it only takes a fraction of the time to simply maintain an edge like this once you have it on your tools already. In fact, once you get to this point you only have to use the last two grits to keep this edge super sharp and mirror finished.
At this point, I knew this machine was a “keeper.” So I decided to build a base with a drawer to keep all the accessories in. I used 1/2 inch plywood scraps that I had saved from another project to build the box. I then constructed the drawer out of 1/4 inch hardboard with glue and pin nails. When I use the machine, I simply clamp the base to my workbench so it doesn’t move around during sharpening.
This chisel came out better than new! I took four other chisels and three plane irons through the same process and the results are all the same…exceptionally sharp, mirror polished edges. I only have one issue to report here. You cannot rely solely on the heat sink built into the angled port when removing a lot of material (such as when sharpening a very dull chisel like I did). In this case, I used a cup of water to dip the chisel into every couple of passes. I then dried it off and kept going. This was very easy and worked well to cool the metal down.
Here’s another tip: At some point I tore the MicroMesh abrasive. I had to replace it but the adhesive was very stubborn on the glass disk. It was a bit of a chore to remove but came off entirely with isopropyl alcohol. The other abrasives don’t seem to have that problem. By the way, I replaced it with 4000 grit MicroMesh that I bought separately at a local store. The sheet I bought was about half the price of the replacement kit from the manufacturer and was enough to make two disks. I just used some spray adhesive to stick it to the glass. You can easily replace any of the abrasives with less expensive ones if you don’t mind cutting them to size yourself and using spray adhesive (although you can get PSA abrasives in all the grits needed except for the MicroMesh).
As a side note, I want to include my experience with customer service as well. I emailed WorkSharp’s customer support to ask for advice on replacing the torn MicroMesh. I also said that the system was not as good for very dull blades (too much material to remove caused excess heat). They replied within a day or two and advised me to clean the glass plate with ISA (isopropyl alcohol) to remove the adhesive. They also said they would send me some 80 grit disks for better material removal on dull blades and a new 3600 MicroMesh disk to replace the torn one at no charge even though I did not ask for anything. This is great customer service!!!
In conclusion, I found this sharpening system to be excellent all around. It is easy to use, quick and efficient, and the price is great for what you get. The biggest advantages it has over competitors is that you can step through several grits quickly and easily, you can use the angled port with great precision and repeatability, and you can use slotted wheels to see the surface being sharpened. I can’t say much for using the slotted wheels (which is one of the unique and ingenious features of this machine) because I don’t have any curved tools to sharpen. However, I would guess that if you want to use this functionality you should probably buy extra slotted wheels. This way you will have several grits already mounted and ready to use. It is very quick and easy to change wheels on this system so this would be a huge timesaver. I plan on getting a lathe someday and the required gouges, etc. Once I do that and have a chance to use this system on those tools, I’ll report further on it here.
UPDATED 12/21/07:
This month I bought a lathe and an 8 piece chisel set. This means that I finally got to use the slotted wheel on the WorkSharp. Since this is my first lathe I don’t have much experience with sharpening the associated tools. I am getting mixed results with the WorkSharp and it may be because of my inexperience. Here is what I’m finding out:
Using the slotted wheel is very simple. You just turn the machine around so that the open port in the back is facing you. Stick a slotted abrasive on the slotted wheel and mount it in the machine. Turn it on and bring the bevel of the tool up to the port under the wheel and watch through the slots as they spin to get a perfect view of the bevel being sharpened. Carefully turn the tool so that the bevel maintains a consistent surface against the wheel. When the entire bevel is passed over the wheel you’re done! The results are a nicely ground bevel and a very sharp tool.
So what’s the problem? Well, the problem I’m having is keeping a steady hand with certain tools. With regular gouges it isn’t too difficult to get good results because you only have to rotate the tool to keep the bevel resting on the wheel all the way around. However, with fingernail shaped gouges you have to swing the tool in a slow arc while you rotate it in order to keep the same bevel angle. Unfortunately this is proving to be too much of a complication for me to get right. The skew chisel is another story. I’m getting fair results sharpening that on the top of the wheel using the included tool rest. However, it takes a steady hand and a good eye to match the bevel without grinding a new one on the edge!
Ultimately, I’ve taken the advice of a friend (thank you Jeremy) and ordered the 4 piece precision sharpening system from Penn State Industries. This system will supplement my variable speed 8″ grinder with the tool rests I need to get perfect bevels on my lathe tools every time!
Is the WorkSharp still a worthwhile investment? The answer from me is an absolute YES. The current pricing is under $200 (not to mention any special deals retailers offer on occasion). If you were to start from scratch and buy a sharpening system (even just water stones or oil stones), you’d still be spending pretty close to that amount anyway. And then you’d still have to spend extra to be able to sharpen curved tools like lathe chisels, gouges, etc.
All in all, I am very happy with the WorkSharp. I use it all the time and the convenience is well worth the cost. There’s nothing like getting paper thin shavings from a hand plane every time you use it because you can keep it extremely sharp with very little effort. The WorkSharp is definitely a valuable asset in my shop!
Pricing and Suppliers:
The WorkSharp 3000 is priced just around $200. It can be found at most retail locations that sell tools but the best prices are online. Check out Sharpening Supplies for another review and some more detailed pictures!


